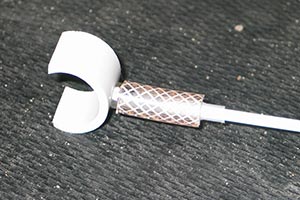
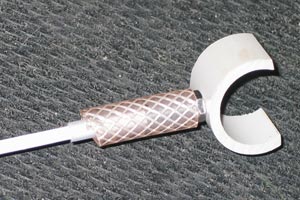
Weave Guides
These weave guides “snap on” to your poles, and are a nice change from guides that have to be slid on, particularly if you stripe your poles! They seem to wear well even with abusive weavers (Belgians & Labs) but may break or pop off if a dog runs through them.
Equipment
- Sawz-all, handsaw, or table saw (depending on your level of comfort)
- Hand drill/drill press with fine bit
- Schedule 40 1″ PVC (for 3/4″ weave poles), 2″ per guide
- Rasp
- Machine Screws, 1 – 1 .25″ phillips head (quantity 2 per guide)
- Nuts to fit
- 48″ length 3/16″ pvc welding rod per guide (US Plastic #45053)
- 1.5″ length, 1/4″ o.d. polyethylene tubing (quantity 2 per guide)
- 1.25 – 1.5″ length sprayhose tubing (1/4″ i.d. – sized to fit snugly over 1/4″ poly tubing and 1/4 – 1/2″ longer than the screws you choose) (quantity 2 per guide)
- acetone & rag
Directions
- Clean ink off of pipe with acetone.
- Cut 1″ lengths of PVC (quantity two) for each guide. We’ll call these O-rings.
- With the PVC O-rings laying on their cut edge (looks like “O” from above) Make a cut at 1:30 (hour hand between 1:00 and 2:00) and 10:30 (10:00 and 11:00) and remove that portion of the ring so you now have a “C.” (If you’re talented with a table saw, you can make this cut first on a length of pipe, then slice 1″ segments off. The rest of you will just have to suffer.)
- Balance the “C” on its back on a flat surface, and mark the approximate center where the guide will come out.
- Drill a hole slightly larger than your screw shank at the marked spot.
- Insert screw into hole.
- Thread nut over screw and tighten.
- Place 1.5″ piece of tubing over end of screw.
- Insert rod into other end of tubing.
- Use power drill to sink screw into tubing. The turning of the screw will push the tubing over the rod in a back and forth fashion, until both are fully seated. Make sure the rod is firmly seated when you’re done. This is more work than it sounds.
- From unfinished side, slide both pieces of sprayhose onto welding rod for later use. These will slide loosely over the welding rod.
- Repeat steps 6 through 10 on other end of rod.
- Slide sprayhose over poly tubing on each end. Again, this is more work than it sounds…
- Rasp sharp edges of PVC if necessary.
Notes:
Because of the wide variety of sizes of rod and tubing available in different locales, you may need to get creative. You’ve seen the basic recipe–there are many variants that will duplicate the effect.
If you have a local Home Depot, look in the plumbing section for the polyethylene tubing and welding rod. Find a combination that is a very snug fit, then find your screws and nuts. The pan head screws seem to sink themselves into the PVC best.
More (smaller O.D.) polyethylene tubing can replace fiberglass rod if you 1) want transparency or 2) can’t find fiberglass. It tends to be droopy in really hot climates but it’s also less brittle. You’re on your own sizing this. Keep in mind the screw and the guide material should be very similar in size, the tubing holding the two together should have an inner diameter roughly matching their o.d., and the third layer of tubing needs an inner diameter just larger than the wire’s o.d.
This design heavily influenced by Tuff Mutt of Olympia, Washington, where they can be purchased if you don’t have the inclination or know-how to build them. They also have a really cool channelized weave design. While the originals weren’t long for this world in the brutal Louisiana sun (welding rod sheared), the “snap on” design set the standard for guides to come. And these are a lot less cheesy looking than guides made from irrigation fittings and wire.


